Are you thinking about starting a podcast, but feeling overwhelmed by all the microphone options out there? As an experienced content strategist, SEO expert and even podcaster, I’m here to make your life easier! In this comprehensive guide, we’ll dive into the top microphones for podcast beginners in 2024. From the complete novice or just looking to upgrade your setup. You’ll find the perfect mic to take your podcasting to the next level.
Get ready to level up your audio quality and wow your listeners with crystal-clear sound! With the right microphone by your side, you can create professional-grade podcasts from the comfort of your own home. Let’s get started, shall we?
The Essentials: What to Look for in a Podcast Microphone
When I first started my podcasting journey, I didn’t realize how much the microphone could make or break the quality of your show. I figured, I’m a Blogging expert! “if it’s good enough for Zoom calls, it’s good enough for recording!” Boy, was I wrong. After a few episodes of what can only be described as “audio chaos,” I realized that the mic matters!
Key features like polar patterns, frequency response, and sensitivity
The first thing I learned was about polar patterns. You know how sometimes you’re talking into your mic, and it picks up everything but your voice? That’s usually because the mic isn’t set up for the right polar pattern. Most beginners (myself included) assume all mics work the same way. The truth is, the polar pattern—the direction from which the mic picks up sound—is crucial. For podcasting, you’ll usually want a cardioid pattern. It’s heart-shaped and picks up sound mainly from the front, which is perfect for solo or one-on-one recordings. If you’re recording a roundtable discussion, though, you might want to look at something like an omnidirectional mic, which picks up sound from all around. And then there’s the bidirectional pattern—good for interviews where you have two people on either side of the mic.
What is Frequency Response?
Another key feature is frequency response. I won’t lie; I had no idea what this meant when I first saw it. I thought, “Isn’t it just sound? Why does it matter”? But frequency response refers to the range of tones a mic can pick up, from the deep bass in your voice to the higher pitches. If you want your voice to sound natural and rich, you need a mic with a frequency response that matches the tone of your voice. Typically, a good range for podcasting mics is around 20Hz to 20kHz. This covers the entire range of human hearing, so it’ll pick up everything from the rumble in your voice to the clarity in your words.
Now, let’s talk about sensitivity—another term I didn’t fully grasp at first. Sensitivity measures how well the mic converts sound into an electrical signal. If your mic is too sensitive, it’ll pick up every little noise in the room. Think ncluding your neighbor’s dog barking or the hum of your AC. Not sensitive enough, and your voice might come through weak or muffled. For podcasting, a mic with moderate sensitivity is ideal. Especially if you’re not recording in a perfectly soundproofed room (let’s be real, most of us aren’t).
Understanding the differences between dynamic and condenser mics
But here’s where I really messed up: choosing between dynamic and condenser mics. I didn’t know the difference and just grabbed the first mic that looked cool. Big mistake. Condenser mics are super sensitive and great for capturing detailed sound, which is why they’re often used in studios. However, they’re also prone to picking up every bit of background noise. So if you’re recording at home with kids running around or traffic outside, it might not be the best choice. On the other hand, dynamic mics are less sensitive to background noise and more durable. Making them perfect for most podcasting situations. They might not capture every tiny detail, but they give you clean, focused audio, which is exactly what you want.
Looking back, I wish someone had told me to invest a little more time into understanding these basics before I started. It would have saved me a lot of headaches (and some cringe-worthy early episodes). So, if you’re just starting out, take the time to consider these features:
- polar patterns
- frequency response
- sensitivity
and the type of mic—before you hit record. It’s worth it, trust me.
Top Picks for Podcast Beginners
When I first dipped my toes into podcasting, I was on a tight budget. I didn’t want to drop a ton of money on gear before I even knew if podcasting was something I’d stick with. If you’re in the same boat, don’t worry—there are some great budget mics out there that won’t break the bank but still deliver solid sound quality.
Budget-friendly Options Under $100
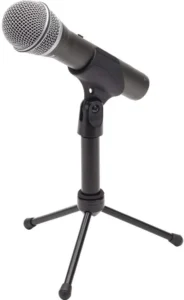
One of the first mics I tried was the Samson Q2U. It’s a steal for under $100 and what’s awesome about it is that it’s a dynamic mic with both USB and XLR connections. That means you can plug it directly into your computer or use it with an audio interface if you decide to upgrade your setup later. The Q2U is super versatile and durable, which is a huge plus if you’re prone to, say, knocking things over on your desk (guilty). The sound quality is pretty impressive for the price—clear, focused, and it even comes with a little stand and pop filter.
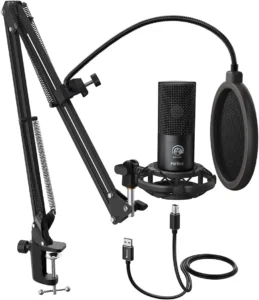
Another budget-friendly gem is the Fifine K669B. I was skeptical at first because it’s even cheaper than the Samson, but it surprised me. It’s a condenser mic, which typically isn’t the best for untreated rooms, but for under $50, it does a good job of picking up vocals with decent clarity. Just be mindful of background noise, and you might want to tweak your environment a bit if you’re using this one—think pillows, blankets, or whatever soft materials you can find to dampen sound.
Mid-range Mics That Deliver Exceptional Value
If you’ve got a bit more to spend and want to step up your audio game, the mid-range mics are where things start to get really interesting. These mics offer a noticeable improvement in sound quality and build without totally emptying your wallet.
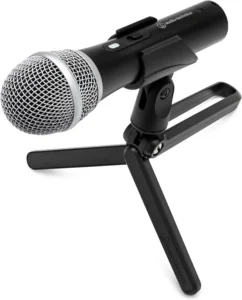
One of my favorite mid-range mics is the Audio-Technica ATR2100x-USB. It’s like the Samson Q2U’s big brother, and for just a bit more cash, you get better build quality and slightly richer sound. It’s also got that USB/XLR combo, making it perfect for beginners who want something they can grow with. The cardioid polar pattern on this mic really helps keep background noise to a minimum, which is a lifesaver if you’re not recording in a studio setting. Plus, it’s incredibly reliable—I’ve dropped mine a couple of times, and it’s still going strong.
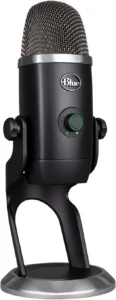
Another solid choice in this range is the Blue Yeti. Now, this mic is a bit of a legend in the podcasting world. It’s a condenser mic, so it’s more sensitive than the ATR2100x, but it’s got multiple polar patterns—cardioid, bidirectional, omnidirectional—which makes it super versatile. Whether you’re recording solo, interviewing someone across the table, or even capturing group discussions, the Yeti’s got you covered. Just keep in mind, it’s a bit bulkier, so you’ll need a sturdy stand to keep it steady.
Premium Mics for the Serious Podcaster
If you’re ready to invest in your podcasting career (or just want to treat yourself), premium mics are where you’ll find some of the best audio quality available. These mics are for serious podcasters who want studio-quality sound and aren’t afraid to spend a little more to get it.
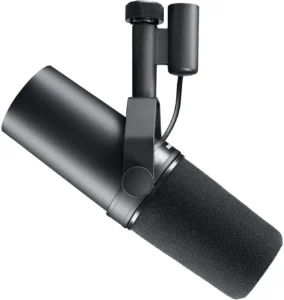
The Shure SM7B is a classic—if you’ve listened to any pro podcasts, you’ve probably heard this mic in action. It’s a dynamic mic, which means it’s less sensitive to background noise, and it’s got a beautifully warm sound that makes voices sound rich and full. The SM7B is also incredibly sturdy, with a solid build that can take a beating. But heads up, you’ll need an audio interface and possibly a cloudlifter to boost the gain, as this mic is notoriously quiet on its own. It’s definitely an investment, but if you’re serious about podcasting, it’s worth every penny.

Another premium option is the RØDE NT1-A. This condenser mic is known for its incredibly low self-noise—it’s one of the quietest mics on the market. That means it picks up just your voice with stunning clarity, without any annoying hiss or hum in the background. The NT1-A is perfect if you’re recording in a well-treated space, as it’ll capture all the nuances of your voice. It’s also bundled with a shock mount, pop filter, and even an XLR cable, which makes it a fantastic all-in-one package for podcasters who want to hit the ground running.
No matter where you are in your podcasting journey, there’s a mic out there that fits your needs and your budget. And trust me, choosing the right mic makes a world of difference in how your podcast sounds—and how confident you feel hitting that record button.
Setting Up Your Microphone for Optimal Performance
When I first started podcasting, I thought placing the microphone anywhere on my desk would be fine. I quickly realized that microphone placement can make a huge difference in sound quality. A poorly placed mic can pick up more background noise, room echo, and even those dreaded plosives (you know, those popping sounds when you say words with “P” or “B”).
Placement and Positioning Tips
One of the best tips I learned was to position the mic about 6 to 12 inches away from your mouth. This distance is close enough to capture your voice clearly but far enough to avoid picking up every little mouth sound or breath. You also want to aim the mic slightly off-axis—meaning don’t speak directly into the center of it. Instead, angle it just off to the side of your mouth. This helps reduce plosives without needing to use a heavy pop filter, especially if you’re using a condenser mic.
Another crucial factor is the height of the mic. You want it to be at the same level as your mouth, not above or below. If the mic is too high or low, it’ll change the sound of your voice, making it either too boomy or too thin. I use a boom arm for this because it allows me to adjust the mic’s height and angle easily. If you don’t have a boom arm, you can stack books or boxes under the stand to get it to the right height—just make sure it’s stable.
Accessories Like Shock Mounts and Pop Filters
Now, let’s talk accessories. When I first started out, I thought accessories were just extras you didn’t really need. But after a few recordings ruined by desk vibrations and harsh “P” sounds, I quickly changed my tune.
A shock mount is one of the first accessories I’d recommend. It’s basically a cradle that holds your mic and isolates it from physical vibrations. Whether it’s the slight tremor from typing on your keyboard, accidentally bumping your desk, or even a heavy truck passing by outside, a shock mount helps keep those vibrations from being picked up by your mic. It’s especially important if you’re using a condenser mic, which is more sensitive to vibrations. Trust me, once you’ve heard that low rumble or tapping sound in your recording, you’ll understand why a shock mount is worth the investment.
Next up, the pop filter. This little guy is essential for reducing those sharp popping sounds that happen when you say words with strong consonants, like “p” and “b.” I’ve tried recording without one, thinking I could just be careful with my pronunciation, but it never really worked. A pop filter is a thin mesh screen that you place between your mouth and the mic, and it helps diffuse the air from your speech before it hits the mic. This simple tool can make a huge difference in the clarity of your recordings. If you’re on a tight budget, you can even DIY a pop filter with a wire hanger and some pantyhose—though the store-bought ones are pretty affordable and a bit more durable.
Mastering Mic Technique for Podcasting
When I first started podcasting, I didn’t give much thought to how close I was to the mic or the angle I was speaking into it. I figured, as long as I was audible, I was good. But I quickly learned that mic technique is a game-changer when it comes to audio quality.
Proper Speaking Distance and Angling
One of the key things I figured out (after a lot of trial and error) is that the ideal speaking distance is typically around 6 to 8 inches from the mic. Any closer and you risk what’s called the “proximity effect,” which can make your voice sound overly boomy and bass-heavy. It’s great if you’re trying to channel your inner Barry White, but not so much for a clear podcast voice. On the flip side, if you’re too far from the mic, your voice might come across as distant or thin, which can make your podcast sound amateurish.
As for angling, I’ve found that speaking slightly off-axis—just a bit to the side of the mic rather than directly into it—works wonders. This simple tweak helps minimize plosive sounds (those sharp “p” and “b” sounds) without sacrificing clarity. I used to think pop filters were the only way to tackle this issue, but adjusting the mic angle can be just as effective, especially if you’re in a pinch and don’t have one handy.
Reducing Background Noise and Echo
One of the best things you can do to reduce background noise is to choose the right space for recording. Ideally, you want a small room with lots of soft materials to absorb sound. Think carpets, curtains, and even those decorative pillows you’ve got lying around. If you’re stuck recording in a more open space or a room with hard surfaces, try throwing a blanket over your desk or hanging some heavy curtains around your recording area. These little hacks make a big difference in reducing the amount of echo and ambient noise that sneaks into your recordings.
Another pro tip I learned is to record at a lower volume and then boost the levels in post-production. This can help minimize the capture of background noise because the mic is less sensitive to distant sounds when the gain is turned down. Of course, this means you’ll need to speak a bit louder and more clearly, but the trade-off is worth it for cleaner audio.
Finally, don’t forget about using noise reduction software. Tools like Audacity or Adobe Audition have noise reduction features that can help clean up your audio after recording. It’s not a magic fix, and it won’t make up for bad recording technique, but it’s a great safety net for those occasional pesky sounds you couldn’t avoid.
Mastering mic technique takes practice, and it’s something I’m constantly refining. But with the right distance, angling, and a few tricks to reduce noise and echo, you’ll find your recordings sounding more professional with each episode. The little details make a big difference in the final product, and your listeners will definitely appreciate the effort
Conclusion:
There you have it, folks – the ultimate guide to the best microphones for podcast beginners in 2024. Whether you’re just starting out or looking to take your show to new heights, the right mic can make all the difference.
Remember, the key is to find a balance between quality, features, and your budget. With the information provided in this outline, you’ll be well on your way to choosing the perfect microphone. Elevate your podcasting game. Happy recording, and don’t forget to have fun with it!
Meet Eric Hegwer
Hi, I’m a middle aged Dad who has always loved blogging as a hobby. When I learned that blogging was a great passive income source, I went all in, and am now sharing my knowledge with you!
Leave a Reply